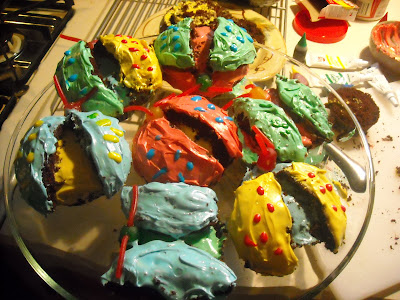
OK, here’s what you’ll need to make 6 good looking bugs:
Here’s how you do it:- Your favorite chocolate or dark colored cake mix
- One can of vanilla icing
- Cans of specialty decorating icing (the kind that comes in the tall can with the plastic nozzles) – variety of colors
- Assorted food coloring
- Paper cupcake cups
- Cupcake pan – 12 places
- Dots (the candy), or anything that looks like Dots
- String licorice
- Skewer or tip of a meat thermometer or a small, clean drill bit
First, find a larva.
Just kidding, you’re going to need lots of larvae.
Just kidding again.
OK, seriously, use your skewer to pre-drill a little hole into one of the Dots.

Next, break off a little piece of the string licorice and stuff it into the hole. Use the skewer again to work it deep into the hole so it’ll stay in place (that's what she said - OHHHH! Bada Bing).

Make at least 6 heads for your pan of cupcakes. I pre-assembled a bunch of heads while J & D napped.

Next, fill each spot in the cupcake pan up to the top of the paper cup. If you were making regular cupcakes you might not fill it this high but you want the cupcake to bake up and over the paper so fill it to the top of the paper and it’ll expand as it bakes.
Once they’re baked and thoroughly cooled, separate out your biggest and smallest cupcakes.
Lop the top off of a smaller cupcake. You’re going to use this top piece for the wings.
Now here’s the secret that the fancy pastry chefs don’t want you to know – or at least I assume they don’t want you to know because it wasn’t in the recipe I read – it takes two cupcakes to make one full bug. Yes...it’s true.
You see, once you cut off the top of a cupcake you can’t apply icing to the remaining part because you’ve cut off the nice outer “shell” and you’re left with the crumbly inside of the cupcake. It’s just like applying caulk to a dirty substrate – the icing bonds to the crumbs and doesn’t stick to the body.
 So once you cut off the top, put the useless, headless cupcake body to the side.
 Now cut that top piece in half – now you have your two wings. You can turn them over so the curves are on the inside and the flat edge is on the outside for butterfly wings or leave them right side up for lady bug wings (see pics).
Next, put some of your vanilla icing into a bowl and add some food coloring (my 3.5 year old enjoyed participating in this part). Apply icing to one of the bigger, non-beheaded, fully intact cupcakes. This will be your first “body”.
Now apply your wings to this “body” cupcake to make either your first butterfly or your first lady bug.
Put some more vanilla icing into a different bowl and mix up another color. Apply this icing to your newly attached wings.
TIP: It’s extremely hard to apply icing to the butterfly wings for the same reason it’s hard to apply icing to the body of a headless cupcake. You may be better off just making a whole batch of lady bugs which is what I wish I had done.
Next apply your decorative icing to make the spots on the wings and stick on a head assembly (this is another place where J was able to help).
TIP: Since you’ve hopefully used a dark colored cake mix, you can leave the icing off one set of wings and just apply the decorative dots for a nice effect.
TIP: Next time I do this I'm going to use some dark colored jimmies to make little eyes and a mouth on each head.
TIP: Take all of those beheaded cupcakes and whatever left over icing you have and go to town – these are mom and dad’s cupcakes.
And you thought lady bugs were just a good luck omen and a friend to farmers (they eat aphids). Who knew they were also so darn tasty!
Ummmm ummm, that’s good bug!
***
***


No comments:
Post a Comment