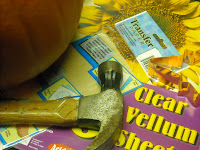
Here’s what you’ll need:
First, prep your pumpkin. J and D helped with this part. I called the guts “pumpkin spaghetti” and they had fun scraping it out and getting messy. - A star shaped cookie cutter. Use any shape you'd like but remember that a curved shape is more difficult to cut. The straight lines that compose a star are pretty easy to manage.
- Free templates from www.pumpkinlady.com. They switch out free patterns every week and they force you to visit each category to find them. Annoying but they’re free.
- A knife with a narrow blade (I used a hybrid hacksaw blade but any long narrow blade will do).
- Hammer or rubber mallet.
- Transfer paper – this is cheap and you can find it in any craft store.
- Vellum paper – this is NOT cheap and you can find it in any craft store.
- Pencil.
- Push pins.
- Strong tape – I used packing tape.
- Spoons to scrape out the pumpkin guts.
- Big bag of cheap votive candles.
- Pumpkins – duh.


TIP: Put the guts in a bowl as you scrape them out. After this project was finished I picked out the seeds and eM baked them with some olive oil and salt.
Once you’re finished the prep, wipe down your pumpkin.
Tape on your transfer paper, graphite side down.
Tape on your pattern. It’s ok if it doesn’t lay perfectly flat.
Use your pencil to trace the pattern.
When you’re finished, remove your pattern and transfer paper. You should now be looking at the pattern on the face of the pumpkin.
Take your knife and get to work. Take your time.
Once you’re finished, use your knife to thin out the walls around your openings so the maximum candle light escapes.
Wipe the pumpkin down again.
The vellum paper is going to diffuse the light from the candle and gives your jack-o-lantern a cool finished look. Place the vellum paper into the pumpkin to get a sense of how much of the paper you’re going to have to cut off. Make your cuts, re-place the vellum paper and use your push pins to hold it in place. Make sure the paper is against the inner wall so none of it drifts over the candle flame and sets your house on fire (hate it when that happens).
Repeat with the second pattern.
Next, place your cookie cutter on the face of the pumpkin. If you have a rubber mallet great! I didn’t have a rubber mallet so I covered the cookie cutter with a rag and used a regular hammer. Hammer the cookie cutter into the face of the pumpkin. Not too far or you’ll have trouble getting it back out.
Place more stars in whatever formation, or lack thereof, you prefer and place them at least 3/4 of the way around the pumpkin.
Pick up your knife and get to carving again. Finish with vellum paper.
Fire up two votives for each pumpkin and drop them in.
Enjoy!
***


What I always do every Halloween is that I check some cool pumpkin carving ideas and then search for patterns. That way, it's easier to carve. Thanks for the tips!
ReplyDelete